Now that you've become a top-notch Visual Basic programmer in less than 24 hours, you're ready to learn how to distribute your applications to other users. If you've installed professional software, you've seen first-rate installation front ends that let the user install software as painlessly as possible. It's your turn to create such a front end with Visual Basic's help. Your applications can be installed using a professional front end installation routine.
The highlights of this hour include
New Term: To compile an application means that Visual Basic translates the application and all its projects into an executable file.
Before you distribute your applications, test them thoroughly using the testing and debugging tools you learned about in Hour 20, "Writing Correct Applications." Once you are satisfied that you've removed as many bugs as possible, you are ready to compile the application.
You'll want to compile your application for these reasons:
NOTE: Compiling an application is often called making a project.
When you compile your project, Visual Basic gathers all the project files together and converts those files into a single executable file. (Sometimes, depending on the project, an extra file or two are needed in addition to the executable file.) The executable file has the .EXE filename extension, and your users can run the application from the Start menu's Run option or from an entry they add to the Start menu.
To compile your application, select File | Make and select a location from the Make Project dialog box that appears. When you click OK, Visual Basic compiles the program. You can now exit Visual Basic and run the program from the Start menu's Run command.
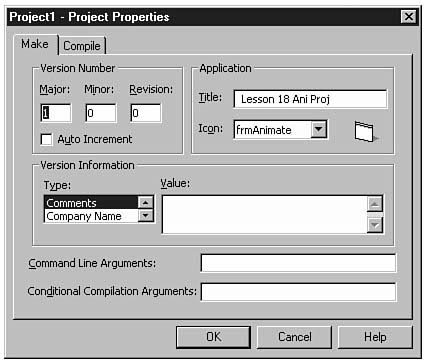
Before you compile a program, you can take a moment to set some project properties that determine how the program compiles. When you click the Options button in the Make Project dialog box (instead of clicking OK to start the compile), Visual Basic displays Figure 23.1's Project Properties dialog box.
NOTE: The Project Properties dialog box you see when making an executable is a scaled-down dialog box from the Project Properties dialog box you see from the Project | Properties menu option.
Figure
23.1. Setting project properties before
compiling.
New Term: Version control refers to the capability of Visual Basic
to assign version numbers, such as 1.01, 1.02, 2.00, and so on, to compiled code.
If you plan to update your application in the future and distribute subsequent versions, set the Major, Minor, and Revision version number text boxes. The versioning values let you distinguish between compiled versions. You might want to place the version number in your application's Help | About dialog box.
TIP: If you plan to issue several versions, consider checking the Auto Increment check box and Visual Basic will update the versions for you at each compilation.
In addition to the versioning information, consider locating an icon you want displayed on the Start menu and on the taskbar that represents your program. The only catch is that you cannot set the application's icon from the Icon list box! The Icon list box lets you select a form name from your project. If your project contains only a single form, that's the only form that appears in the list box. The form's Icon property holds the icon filename, and when you select that form in the Project Properties dialog box, its icon becomes the compiled application's icon.
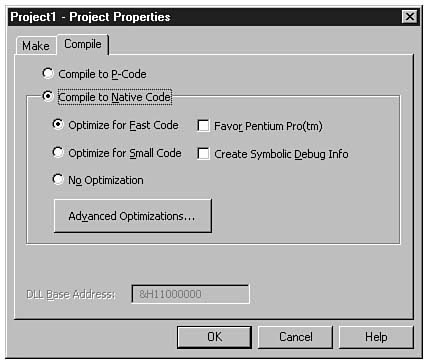
When you click the Project Properties dialog box's Compile tab, you'll be able
to set additional properties, as shown in Figure 23.2.
Figure
23.2. Additional project properties you
can set.
Generally, if you go to the trouble of compiling the application, you'll want to
leave the default option labeled Compile to Native Code set. If you compile as p-code
using the top option, your application will run more slowly and require a runtime
.DLL file that you must distribute along with your application.
New Term: P-code is an interpreted language that works beneath some compiled Visual Basic applications. P-code, which stands for pseudocode, tells the system what your application wants to do next. Native code, on the other hand, is a machine language that your computer understands directly without the need for a time-consuming interpreted language such as p-code. Versions of Visual Basic before 5.0 could not compile applications into native code so programmers had to use p-code. P-code still exists for compatibility, but you'll always want to compile into native code for the fastest execution speed your application can achieve.
By clicking the Advanced Optimizations command button, you display another set
of options, as shown in Figure 23.3. The only problem with that set of options is
that they all make for a more efficient running application but also for an application
that checks less for runtime errors. You will want to set one or more of these advanced
options only if you have thoroughly tested your application.
Figure
23.3. These options request less runtime
error checking.
WARNING: You are safer using one or more of the advanced optimization options if your application uses no floating-point arithmetic or if it heavily uses arrays.
New Term: The Application Setup Wizard is a wizard that turns your compiled application into a complete installation disk set.
Once you test and compile your application, you are ready to create the distribution set of files that your user uses to install the application. Visual Basic supplies the Application Setup Wizard to help you turn your application into distributable disks.
Not every application should be installed from disks, and the Application Setup Wizard creates a distribution set for just about any kind of installation, such as for CD-ROM installations and for networked computer users who want to install the application from a server. Actually, the Application Setup Wizard performs several tasks, including the following:
Once you compile your application, you must exit the Visual Basic development
environment and start the Application Setup Wizard from the Windows Start menu. Locate
the Start menu from which you normally start Visual Basic, but instead of starting
Visual Basic, start the program named Application Setup Wizard to display the wizard's
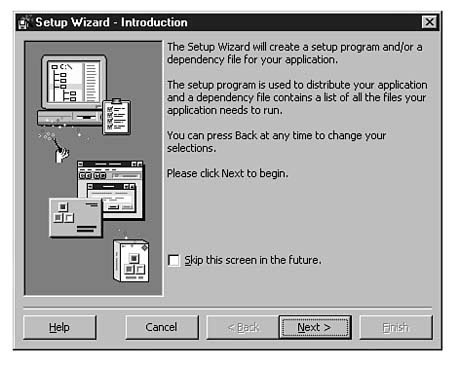
opening dialog box, shown in Figure 23.4.
Figure
23.4. The Application Setup Wizard's opening
dialog box.
TIP: As with most wizards, you can skip this introductory dialog box for future runs if you click the option labeled Skip this screen in the future.
New Term: An installation template file is a file generated by the Application Setup Wizard that holds an application's setup instructions.
The Application Setup Wizard must know exactly which files to include with the installed set of disks. Even though the Setup Wizard installs your application's executable program, the Application Setup Wizard must search your application's project file (the application's project filename extension is .VBP, as you might recall) to get a list of all related files. In addition, the Application Setup Wizard searches for your application's template file (with the .SWT filename extension) to see if you've previously created a setup set.
TIP: If you let the Application Setup Wizard create a setup template, you can later change parts of the setup without reissuing all the options all over again. In subsequent setup builds, you can change the options that you want to change but leave the other setup options set to their current state.
New Term: A dependency file is a reference file that determines which files are needed by other files. For example, an application might require an ActiveX control to execute, and that ActiveX control would be a dependency file for the application.
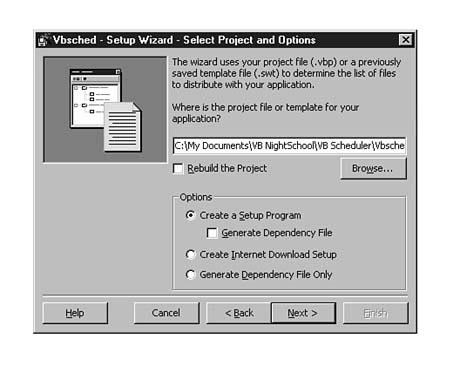
When you move to the second Application Setup Wizard dialog box, you'll see the
dialog box shown in Figure 23.5. From this screen you can specify dependency files.
Figure
23.5. Selecting the project to build and its options.
The Select Project and Options dialog box lets you select the project you want to
build by clicking the Browse command button or by typing a path and filename in the
text box. (Click the Rebuild the Project option if you want the Application Setup
Wizard to compile the project once again before building the setup application.)
The options at the bottom of the dialog box dictate one of the following setup approaches:
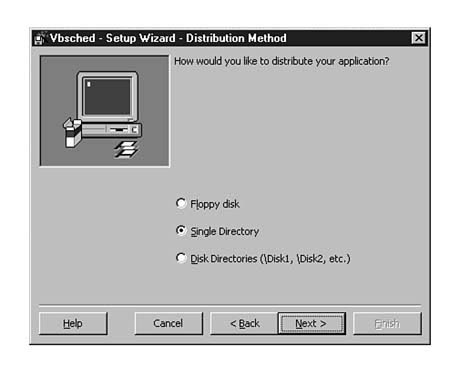
Once you set the options, click Next to display Figure 23.6's dialog box.
Figure
23.6. Telling the Application Setup Wizard
how you want the installation distributed.
The Distribution Method dialog box tells the Application Setup Wizard how to build the setup program. The Floppy disk option installs the setup files onto one or more floppy disks. The Single Directory option installs the setup routine to a single hard disk directory, which you then could copy to a CD-ROM (if you have the appropriate hardware). The Disk Directories option tells the Application Setup Wizard to copy the setup files to a hard disk but to create folders that represent installation disks (named Disk1, Disk2, and so on). You'll have the option of copying the folders to disk or installing the application from your disk to another computer elsewhere on the network.
NOTE: If you install to a single folder, the next dialog box requests the folder name and location.
Once you've determined how and where to set up the installation routines, the
Application Setup Wizard displays Figure 23.7's Data Access dialog box. If your application
performs any data access, select the kind of database used. If you use Access 97,
you don't need to make a selection because the Application Setup Wizard can determine
the need for Access 97 support without your help, but you do need to keep the dbUseJet
option marked.
Figure
23.7. Telling the Application Setup Wizard
if your application uses database files.
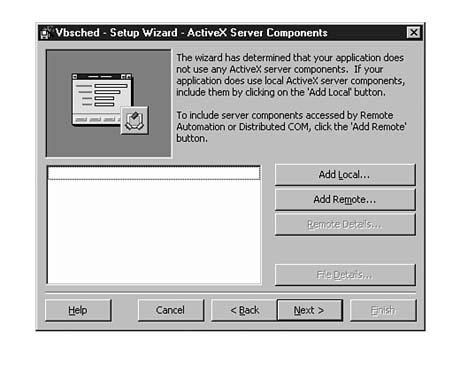
Once you click Next, you will probably see an empty ActiveX Server Components dialog
box such as the one shown in Figure 23.8. The Application Setup Wizard attempts to
locate all the ActiveX controls and server information your application requires,
but the Application Setup Wizard often misses things.
If your application uses any ActiveX control besides those from the normal intrinsic
Toolbox window toolset, but you don't see the ActiveX control on the ActiveX Server
Components dialog box, click the Add Local command button to select the ActiveX controls
your application needs.
Figure
23.8. Be careful even if you see no ActiveX
entries.
TIP: If your ActiveX controls are called remote ActiveX controls, you will need to click the Add Remote command button to point the Application Setup Wizard to the remote computer where the it can find the needed files.
When you click Next, the Application Setup Wizard displays a dialog box that lists
all dependencies found and specified by you (such as database and ActiveX control
dependencies). To accept the dependencies, click Next, and the Application Setup
Wizard begins its job of gathering all the files necessary to create the setup files.
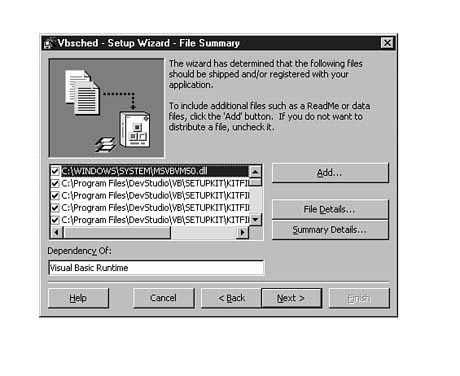
Figure 23.9 shows the dialog box that lists all the files the Application Setup Wizard
found in one particular project.
Figure
23.9. The collection of Application
Setup Wizard files.
When you see Figure 23.9's dialog box, take an extra moment to search through the list, looking for any details left out. You'll see files listed that you did not know were needed for your application (such as .DLL files needed by your program), ActiveX files, and other files gathered from your application's Project Explorer window.
WARNING: Creating help files can be tedious unless you have a help file-building application that makes help file creation and management simpler. If you use help files (these files will end with the .HLP extension), make sure that all the help files reside in the File Summary dialog box's list of files, or your users will not have access to the help files and will get errors if they attempt to request help.
Click Next for the Finished dialog box once you've looked through the list of included files. If you then click the Save Template command button, the Application Setup Wizard saves your setup instructions to a template file so you don't have to re-enter all the details again if you want to modify the setup in the future. When you click Finish, the Application Setup Wizard does its job and builds your setup files at the location you specified. Click OK to close the final ending dialog box that appears after the setup is complete. The Application Setup Wizard goes away, and you'll be back at your Windows desktop.
Make sure that you test your setup installation to ensure that the installed application performs the way you expect. If you forgot a dependency or did not even know your application required one (this is common, so expect it), your installed application will not run correctly. You then can begin to trace the problem, such as adding an ActiveX control file to the dependency list if the control is missing.
To run the installation, select the Start menu's Run command, click Browse to locate the Setup.exe file, and click OK.
NOTE: The default installation folder is Windows\Temp\Swsetup, although you probably will change that when you build the final installation. You may need to browse this folder to locate Setup.exe the first time you install the application.
After an initial dialog box, you can click an install button to begin the installation. The installation routine will not overwrite existing files on the target computer if the target computer already has newer files that have the same filename. If the installation routine finds such a file, the routine will ask the user for permission to overwrite the current file or leave the newer file intact. Most of the time the user should leave the existing files to preserve newer versions of their software, especially ActiveX controls.
New Term: An uninstall routine removes the application, including all related files, from the computer.
One of the best features of the setup routine is its ability to create an uninstall routine for the application. To uninstall the application, select Settings | Control Panel from the Windows Start menu and double-click the icon labeled Add/Remove Programs. Your installed application will appear in the list of applications available for removal. Click the Add/Remove command button, and the uninstall process begins.
This hour explains how to create an installation routine for the applications you distribute. Your users will get a bulletproof installation routine which ensures that all necessary files are installed to the user's system so that your application runs properly. Of course, you'll first have to test the application to ensure that the bugs are out before you distribute the installable application to users. Not only does the setup routine install the files, but the setup routine also creates an uninstall routine with which your users can remove all files related to the application.
The next hour describes how to write Internet-aware applications that integrate the application with the Web.
The quiz questions and exercises are provided for your further understanding. See Appendix C, "Answers," for answers.
Change the form icon from Hour 18, "The Graphic Image Controls," to one of the happy face icons used in the project. Compile the project and make sure that the compiled application uses the icon for the project icon. Create an installation routine for Hour 18's animation application. Create a template for the installation. Install the application using the setup routine. Run the application (look in the Program Files folder for the application) to make sure everything works well. If you need to change something, re-run the installation and load the template to locate potential problems. After you create a successful installation, open the Control Panel and uninstall the application.
![]()
![]()
![]()
![]()
![]()