Rarely do Visual Basic programmers use the file-related controls that you see on the toolbox such as the File List Box control. More often, programmers use the File Open and File Save dialog boxes you can produce from the Common Dialog Box control (refer to Hour 12, "Dialog Box Basics"). The dialog box gives users the ability to select files and link to other networked computers and files.
You must make additional file-related decisions besides which controls to use to select files. In addition to the controls you display for the user, you must decide if you want to write file-access routines yourself or use database controls that come with Visual Basic. The file routines are tedious and old-fashioned and difficult to debug; the database controls are sometimes overkill, especially if you don't use an external database or if your application uses only a small data file.
This lesson gives you the best of both worlds. You will learn how to write file-access routines for small file-related data and you'll master the database control as well. Even if you don't work with files at the file-access level, the first part of this lesson prepares you for the concepts you need to use the Data control.
The highlights of this hour include
If you've collected data from the user and stored that data in variables and arrays, you can save the data to the disk for later retrieval. Also, you can access disk files from within Visual Basic for product inventory codes, amounts, customer balances, and whatever else your program needs from the long-term data file storage. Visual Basic supports several ways you can store and retrieve information to and from disk files. This section introduces several new file-related terms.
Several database access controls exist that read and write the data you've put in databases using products such as Microsoft Access and Paradox. Even though these controls provide more power and ease than you can get by programming alone, you'll still need to understand fundamental disk access routines. Once you learn the more primitive disk access statements taught in the next several sections, you will more quickly understand the internal workings of the Data control that the last part of this lesson teaches.
New Term: A file is a collection of related data as well as programs that you buy and write, documents from your word processor, and data your applications write to disk.
Although you already know what a file is, this lesson works with data files and it often helps to understand specific terminology as soon as possible. Actually, your application can read any file whether or not the file is a data file, but the file's format determines how you'll read that file, as you'll learn here. Generally, you'll use Visual Basic to create and access data and text files stored on the disk.
NOTE: Although you can use Visual Basic to write utility programs that read other kinds of files such as system and program files, this book does not cover such file I/O.
New Term: A data file holds data on the disk.
The files this lesson discusses are data files and those data files may be textual or stored in a database format. Every file is stored under a unique filename to its folder (often called a directory) and disk drive. Therefore, there can't be two or more files with the same filename unless the files reside in different folders or on different disks.
Data files can take on all kinds of formats. Generally, newcomers to Visual Basic should stick with data files that are textual in nature. Reading and writing text files is rather simple using standard statements that have existed in BASIC-like languages for many years. Once you learn these fundamental file statements, you can begin to use more advanced database files to add power to your applications.
Text files are readable by virtually any kind of program, and virtually any program can produce text files. Sometimes, text files are called ASCII files because text files consist of strings of ASCII characters, as opposed to binary files, which are only readable by special programs and system utilities.
Before Visual Basic can access a file, you or the user will have to direct Visual Basic to the exact location on the exact disk where the file is stored. If your user is selecting a file, you can display the File Open dialog box to give the user the ability to easily change drives, folders, and filenames. When your program accesses a file that the user doesn't know about, such as a data file that holds temporary program data, your program will have to supply the drive, folder, and filename.
The Open statement performs various tasks such as locating a file, making sure the file exists if needed, and creating some folder entries that manage the file while the file is open. A Visual Basic program always has to open a file, using Open, before the program can read or write data to the file (unless you use the Data control described later in this lesson).
TIP: Think of the Open statement as doing for Visual Basic what an open file drawer does for you when you want to retrieve a file from a filing cabinet. The Open statement locates the file and makes the file available to Visual Basic.
Here is Open's format:
Open strFileName [For Mode] As [#]intFileNumber
strFileName must be a string value or string variable that holds a filename. The filename must reside on the default drive or folder unless you specify the full path to the file in strFileName. Visual Basic includes a CurDir() function that returns the current directory folder as a string; you can append this folder name or specify the full path inside the strFileName string argument.
The Mode value must be a named value from Table 15.1. Visual Basic supports additional mode values, but this book does not cover the more advanced or esoteric Mode values. The Mode tells Visual Basic exactly what your program expects to do with the file once Visual Basic opens the file.
Table 15.1. Open's Mode values.
| Mode | Description |
| Append | Tells Visual Basic that your program needs to write to the end of the file if it already exists. If the file doesn't exist, Visual Basic creates the file so your program can write data to the file. |
| Input | Tells Visual Basic that your program needs to read from the file. If the file doesn't exist, Visual Basic issues an error message. As long as you use a file-selection frame properly, Visual Basic will never issue an error because the file-selection frame forces the user to select a file or cancel the selection operation. |
| Output | Tells Visual Basic that your program needs to write to the file. If the file doesn't exist, Visual Basic creates it. If the file does exist, Visual Basic first erases the existing file and creates a new one under the same name, thereby replacing the original one. |
The pound sign (#) is optional, although most Visual Basic programmers specify it out of habit (some previous versions of the BASIC language required the pound sign). The intFileNumber value represents a number from 1 to 255 and associates the open file with that number. After you open a file successfully (assuming that there are no errors such as a disk drive door being left open), the rest of the program uses file I/O commands and functions to access the file. The file number stays with the file until you issue a Close command (see the next section) that releases intFileNumber and makes the number available to other files.
NOTE: The file number is sometimes called the file channel.
As with all DOS and Windows file descriptions, you can specify the drive, directory, and filename using uppercase or lowercase characters.
If your application uses multiple files, you can open more than one file simultaneously within a single application. Each command that accesses one of the files directs its activity toward a specific file using that file's intFileNumber. The following Open statement creates and opens a data file on the disk drive and associates the file to file number 1:
Open "d:\data\myfile.dat" For Output As #1
If you knew that the file already existed and you needed to add to that data file, you could use the Append mode to add to the file with this Open statement:
Open "d:\data\myfile.dat" For Append As #1
NOTE: As you can see, the Open statement's mode prepares the file for the type of processing your application will perform.
One Visual Basic program can have more than one file open at the same time. If the #1 intFileNumber argument were in use by another file that you had opened earlier in the application, you could assign the open file to a different number like this:
Open "d:\data\myfile.dat" For Append As #5
Any currently unused intFileNumber works; you can't associate more than one file at a time to the same intFileNumber value.
The following Open statement opens the same file for input if another application needs to use the data:
Open "d:\data\myfile.dat" For Input As #2
Visual Basic supplies a helpful built-in function named FreeFile() that accepts no arguments. FreeFile() returns the next available file number value. For example, if you've used #1 and #2 for two open files already in the application, without closing one of them, the next value returned from FreeFile() will be 3. FreeFile() is most helpful when you write general-purpose subroutine and function procedures that need to open files, and the procedures may be called from more than one place in an application. Each calling location might open a different number of files at the time. Any procedure can determine the value of the next available file number like this:
intFileNum = FreeFile()
Subsequent Open (and Close) statements could use the file number returned. No matter how many files are open, the procedure will always use the next file number in line to open its file.
The Open command associates files using file numbers with which the rest of the program will access the file. The three Mode values determine how Visual Basic uses the file. If you want to write to a file, you can't use the Input mode, and if you want to read from a file, you can't use Output or Append.
The Close statement performs the opposite job from Open. Close closes the file by writing any final data to the file, releasing the file to other applications, and giving the file's number back to your application in case you want to use that number in a subsequent Open statement. Eventually, every program that opens files should close those files. Use Close to close files.
Here are Visual Basic's two formats for Close:
Close [[#]intFileNumber] [, ..., [#]intFileNumber]
and
Close
The first Close format closes one or more open files, specifying the files by the file numbers you used to open the files. The pound sign is optional in front of any of the file numbers. The second form of Close closes all files that are currently open. Close closes any open file, no matter what mode you used to open the file.
If you create a file by opening the file with the Output mode, and then close the file, you can reopen the same file in the same program in the Input mode to read the file.
The following statement closes the two open files that were opened and attached to file numbers 1 and 3:
Close 1, 3 ` Closes 2 files
The following statement closes all files, no matter how many are open:
Close ` Closes ALL files
You can use Visual Basic's Kill command to delete one or more files. If you want to delete a file from within a Visual Basic program, follow Kill with a string that contains the filename, including an optional disk and drive path. For example, Kill "C:\Dat\MyData.DAT" erases the file named MyData.DAT located on drive C: within the Dat folder. Kill does not perform the same action as Close; Close puts the file away in a safe area and releases the file from its I/O link; Kill permanently erases the file from your disk.
The Write# command is perhaps the easiest command to use for writing data to a file. Write# writes data of any data type to a file. Using corresponding input statements that you'll learn here, you'll be able to read data that you sent to a file with the Write# command.
Write# lets you write data of any format to any disk file opened in the Output or Append modes. Write# writes strings, numbers, constants, and variables in any and all combinations to a disk file.
Here is the format of Write#:
Write #intFileNumber [, ExpressionList]
intFileNumber must be a file number associated with a file opened for output. If you don't specify variables or values to write, Write# writes a carriage return and line feed character (an ASCII 13 followed by an ASCII 10) to the file, putting a blank line in the file. If you specify more than one value in ExpressionList, Visual Basic writes that data to the file using the following considerations:
#yyyy-mm-dd hh:mm:ss#
#True#

#False#
The following statement writes five values to the disk file opened on file number 3:
Write #3, intAge, blnChecked, curSal, dteEnd, strName
This Write# statement writes a single line to the open disk file. The line might look like this:
47, #True#, 17423.61, #1-5-1998 14:21:10#, "Mary Sue"
If the application contained multiple Write# statements, or if the Write# statement appeared inside a loop, a new line would write to the file each time Write# executed.
TIP: End the Write# with a semicolon (;) if you want the next Write# to continue on the same line in the data file.
New Term: Append means to add to the end of something.
If you open a file using the Append mode, Write# adds to the end of the file. If the file were open in Output mode, the first Write# would overwrite the file's contents and start a new file.
You can write data to files from variables as well as from controls on the form. Wherever you've got data that needs to be written, Visual Basic's Write# command will write that data to a disk file that you've opened.
Listing 15.1 contains a subroutine procedure that accepts four arrays of four different data types and writes that array data to a disk file named Values.Dat opened in the procedure. Notice how you can use a simple For loop to write large amounts of data to a data file. The fifth argument sent to the subroutine is assumed to contain the total number of elements defined for the arrays so that the procedure can properly step through the entire array.
Private Sub WriteData (CNameso As String, CBalc() As _

   Currency, CDate() As Variant, CRegion() As Integer)

   ` Writes array data to a file

   Dim intCtr As Integer   ` For loop control


   ` Assumes that each array has the

   ` same number of elements defined

   Dim intMax As Integer

   intMax = UBound(CNames)   ` The maximum subscript


   ` Write intMax lines to the file

   ` with four values on each line

   Open "c:\Mktg.dat" For Output As #1

   For intCtr = 1 To intMax

      Write #1, CNames(intCtr), CBalc(intCtr), _

                CDate(intCtr), CRegion(intCtr)

   Next intCtr

   Close #1

End Sub
Here are six lines from Mktg.dat that the program in Listing 15.1 might write:
"Adams, H", 123.41, #1998-11-18 11:34:21#, 6

"Enyart, B", 602.99, #21:40:01#, 4

"Powers, W", 12.17, #1999-02-09#, 7

"O'Rourke, P", 8.74, #1998-05-24 14:53:10#, 0

"Grady, 0", 154.75, #1999-10-30 17:23:59#, 6

"McConnell, I", 9502.32, #1999-07-12 08:00:03#, 9
The pound signs around the date and time Variant values help Visual Basic when you subsequently read the data values back into variant variables. As you can see, the date may have a missing time or the time may have a missing date. Write# still writes as much of the date and time as is available within that Variant value.
Input# reads data from files and stores the file data in your program's variables and controls. Input# is the mirror-image statement to Write#. You use Input# to read any data that you send to a file with Write#. The Input# statement reads data into a list of variables or controls. Here is the format of Input#:
Input #intFileNumber [, ExpressionList]
Again, the bottom line to using Input# is that Input# is the mirror image of the Write# statement that produced the file data. When you write a program that must use data from a data file, locate the program's Write# statement that originally created the data file, and use that same format for the Input# statement.
The following Input# statement would read one line of values written with Listing 15.1's Write# statement:
Input #1, CNames(intCtr), CBalc(intCtr), _

          CDate(intCtr), CRegion(intCtr)
New Term: A record is a row in a file.
When reading data from a file, you can easily cause an error by attempting to read more data than the file holds. For data files that hold data such as customer balances and employee pay values, the number of records varies because you'll add and remove records as transactions take place.
Use the built-in Eof() function to test Visual Basic's end-of-file function that senses when an input reaches the end of the file. Here is the format of Eof():
Eof(intFileNumber)
Eof() returns True if the most recent reading of the input file just reached the end of the file and returns False if the input file still has data left to be read. Most data input programs loop until the Eof() function returns True. Perhaps the best way to use Eof() is with a Do Until-Loop that follows this general format:
Input #1, VariableList      ` Read first record

Do Until (Eof (intFileNumber) = True)

   ` Process the record just read

   Input #1, VariableList   ` Get more data

Loop
If there are 0, 1, 10, or 400 records in the file, this format of Do Until will keep reading, but will stop as soon as the end of the file is reached. Many programmers often increment an integer counter variable inside the loop to count the number of records read. The counter is useful later if you're reading the file's data into arrays. If you read file data into arrays, be sure to dimension more than enough array elements to hold the maximum number of records expected.
Line Input# reads data from open data files. Unlike Input#, Line Input# reads each line of data in the file into a string variable. You don't have to specify separate variable names after a Line Input# because Line Input# requires a single string value. Line Input# reads data from any file whose lines end with a carriage return and line feed sequence. (Most file records end this way.)
The Line Input# command is simple to use for reading entire records into a single variable. Whereas Input# reads each record's values individually, Line Input# reads an entire record, including all data, commas, quotation marks, and everything else. The string receives the record's contents. Here is the format of Line Input#:
Line Input #intFileNumber, strVariableName
No matter how many record values appear in the file associated with file number 3, the following Line Input# statement reads an image of the record into the String variable named strARecord:
Line Input #3, strARecord
New Term: A database system is a program that organizes, manipulates, retrieves, and reports data.
If you use a database for your data, you can take advantage of Visual Basic's Data control to access the database from within your Visual Basic applications. The Data control makes it easy for you to retrieve data and display values from a database file without using any of Visual Basic's specific file-related commands that you learned about in the first part of this lesson.
NOTE: An organization's information is more likely stored these days in a database than in a file readable by the file commands you learned about in the previous sections. Nevertheless, the file commands are useful for simple files, especially text files your Visual Basic application creates and manages. Also, some data files that other applications create do not appear in a database format but in a record format you can read with those file statements. In addition, the file concepts you learned will help you master the Data control faster and appreciate the Data control more because the Data control takes so much work out of your hands by automating database access.
If you use any of the following database applications, you'll be able to write a Visual Basic application that accesses the data within your database without resorting to the file-related commands described earlier in this lesson:
The Data control makes database access simple.
New Term: A field is a column of data inside a file.
A database application manages your data in a record and field format. The database, however, does not necessarily store your data in records and fields in a table-like format, but the database makes the data appear to your program in that format. Visual Basic takes advantage of this format and retrieves data in the record and field format no matter how the database physically stores the data.
One challenge when using database access is that you must often describe parts of the database to Visual Basic. Visual Basic cannot magically understand your database structure. When you place the Data control on your form, you'll have to tell the control the structure of your data and tell the Data control which parts of the data to access so that the control can properly retrieve data. For example, by setting appropriate property values, you must tell the Data control the name of your database, the table, and the fields to access.
New Term: A table is a file in a database. A database might contain several tables.
Some databases, such as Microsoft Access, store all the related database files in a single global file called the database file. Inside the database, the individual groups of records and fields are called tables. Other database systems, such as dBASE, keep track of an application's files separately and each file that contains data in rows and fields is a database file. When you use a database such as Microsoft Access, as this lesson does, you must describe both the overall database and the individual table name within the database that the Data control is to track.
This lesson does not provide you with a table of Data control property descriptions because too many of the descriptions are database related and too advanced for this discussion. You may not need to know more properties than described in the small data application at the end of this lesson in most cases. You will probably be surprised at the amount of power the Data control gives you.
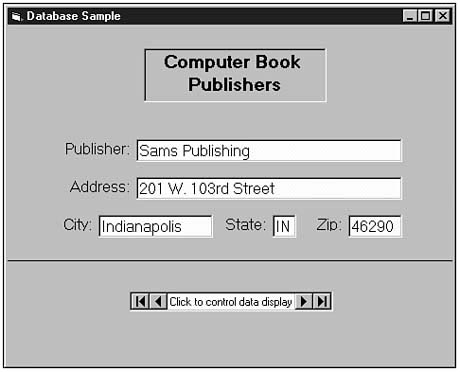
Figure 15.1 illustrates a Data control in use. Notice that the Data control works
a lot like a VCR's series of buttons. You can step through the database one record
at a time. The control itself does not display data. Instead, the control simply
lets you regulate the access of data. You'll have to supply other controls, such
as labels or text boxes, to display and collect data for the database. In other words,
if you want the user to be able to move to a particular record, you'll supply a Data
control that the user can push to get the record in the database. Then your application
can display the data on the form using label controls.
Figure
15.1. The Data control sends database
data to your application.
New Term: A bound control is a control
you can link to a database, via the Data control, that displays and updates the database
if the user modifies the data in the bound control.
The Data control is a two-way street; not only does the Data control display database data, but your user can modify the data that the data control displays, and the Data control makes sure that the changes get made to the underlying database through bound controls. If you don't want the user to be able to change data displayed from a Data control, you can use a label and not a text box to display the database data. You can bind several other controls to the Data controls and make the control read-only so that the user cannot change the underlying database.
Figure 15.1's text boxes are bound to the Data control on the form. Therefore, if the user changes the data in any text box that displays a value from the database, the underlying record's field value changes as well. The application is required to do nothing.
Figure 15.1 shows an application that you are about to build. Do you want to be really shocked? The application will contain no code whatsoever. The entire database access and update can be done just with the controls on the form!
WARNING: In most database applications, code is required. If the user is to add new records and delete old ones, for example, code is needed. For simple displaying and updating of existing data, however, the Data control, labels, and text boxes can do all the work.
Figure 15.1's book publisher application uses a database that comes with Visual Basic named Biblio.mdb. The database is a Microsoft Access database and contains computer book titles and publishers.
Perform these steps to build Figure 15.1's application:
Run the application, and you'll be looking at the first record in the database. Click the Data control's buttons to move through the database records. If you change a value, you will be changing the actual database itself because of the bound text box controls. Despite the fact that the application requires a lot of controls, no code is required due to the Data control's powerful database retrieval and update abilities.
NOTE: Once you master the Data control, you can learn Visual Basic's powerful Data control methods that, with code alone, let your application step through database records, update fields, and compute values from tables. In addition, the Visual Basic language supports special industry-standard database instructions called SQL (pronounced "see-quel") that you can apply to data to select and sort information from within a database. Professional and Enterprise Edition users have the ability to move beyond the Data control and master the DAO (which stands for Data Access Objects), which give you extended power to control database records.
Visual Basic comes with a tool called the Data Form Wizard that you can use to access a database and generate a form. The Data Form Wizard analyzes a database, locates the fields for you (you don't have to know the format of the database ahead of time), and automatically builds a form that contains an appropriate title, field names, Text Box controls for the fields, and the Data control you can use to move between the records.
New Term: An add-in application is a tool that extends Visual Basic's development environment.
To access the Data Form Wizard, select the Add-Ins | Data Form Wizard menu option.
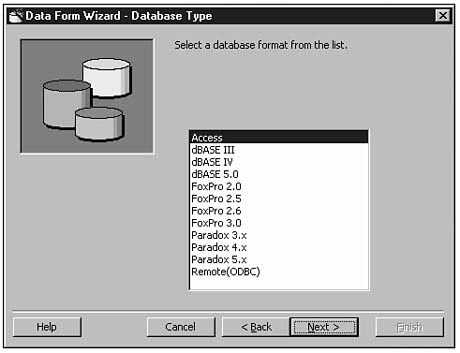
Visual Basic displays the Data Form Wizard's opening window. When you click Next,
you see the database-selection dialog box shown in Figure 15.2.
Figure
15.2. The Data Form Wizard's database
selection tool.
Continue following the wizard's requests to create the form. For example, you will
have to tell the wizard the kind of database you want to create a form. Once you
select a database, the next dialog box asks you for the database name (which you
can browse for) and a data source such as a table or query. Select the kind of form
and then on the Record Source dialog box you must select a table and then copy all
the fields you want from that table to the final form. You then can click the options
you want and click Finish to generate the form.
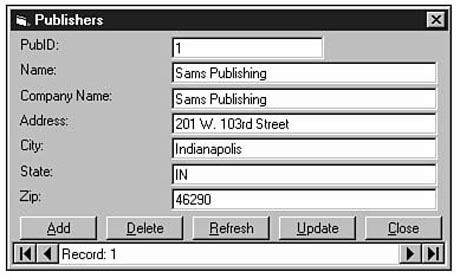
The form that the Data Form Wizard generates may not be as unique as the one you create yourself, but the form does include buttons that let the user not only change the database data but add and delete records as well, as Figure 15.3 shows.
NOTE: You can insert the Data Form Wizard's form into another application and then display the form with the Show method.
Figure 15.3. The Data Form Wizard creates a nice form.
In this hour you have learned about two important aspects of files and Visual Basic. You have learned about regular data files that your applications can create, append to, and read. Also you have learned how to use the Data control and its bound controls such as the Text Box control to give the user a way to change the data in an underlying database.
Although the Data control is easy to use, most programmers have access to a database. If you have yet to select a database product, consider Microsoft's Access because of its close ties to Office and Visual Basic. Using Microsoft's Access, you will need to do only a minimal amount of work to make Visual Basic work with your Access database. Access now includes Visual Basic for Applications, a VB-like language.
The next hour describes how your application can access the printer to produce output.
The quiz questions and exercises are provided for your further understanding. See Appendix C, "Answers," for answers.
Close
![]()
![]()
![]()
![]()
![]()